PIG AI SDK 使用
PIG AI SDK 用于第三方集成 PIG AI 平台的聊天和 AI 功能。
特性
- ✅ API Key 认证:直接使用 API Key 调用平台接口,无需额外获取 Token
- ✅ 双模式响应:支持流式(回调)和阻塞两种响应模式
- ✅ 流式输出:支持 SSE(Server-Sent Events)实时消息流
- ✅ 异常分级:完善的异常层次结构,方便错误处理
- ✅ 线程安全:支持多线程并发使用
- ✅ Builder 模式:简洁的 API 设计,易于配置
- ✅ 重试机制:网络错误自动重试(指数退避)
- ✅ 日志支持:集成 SLF4J,便于调试和监控
- ✅ Java 8 兼容:无需升级 Java 版本
快速开始
1. 添加依赖
在您的 pom.xml 中添加:

<dependency>
    <groupId>com.pig4cloud.ai</groupId>
    <artifactId>pig-ai-sdk</artifactId>
    <version>0.1.1</version>
</dependency>
2. 获取 API Key
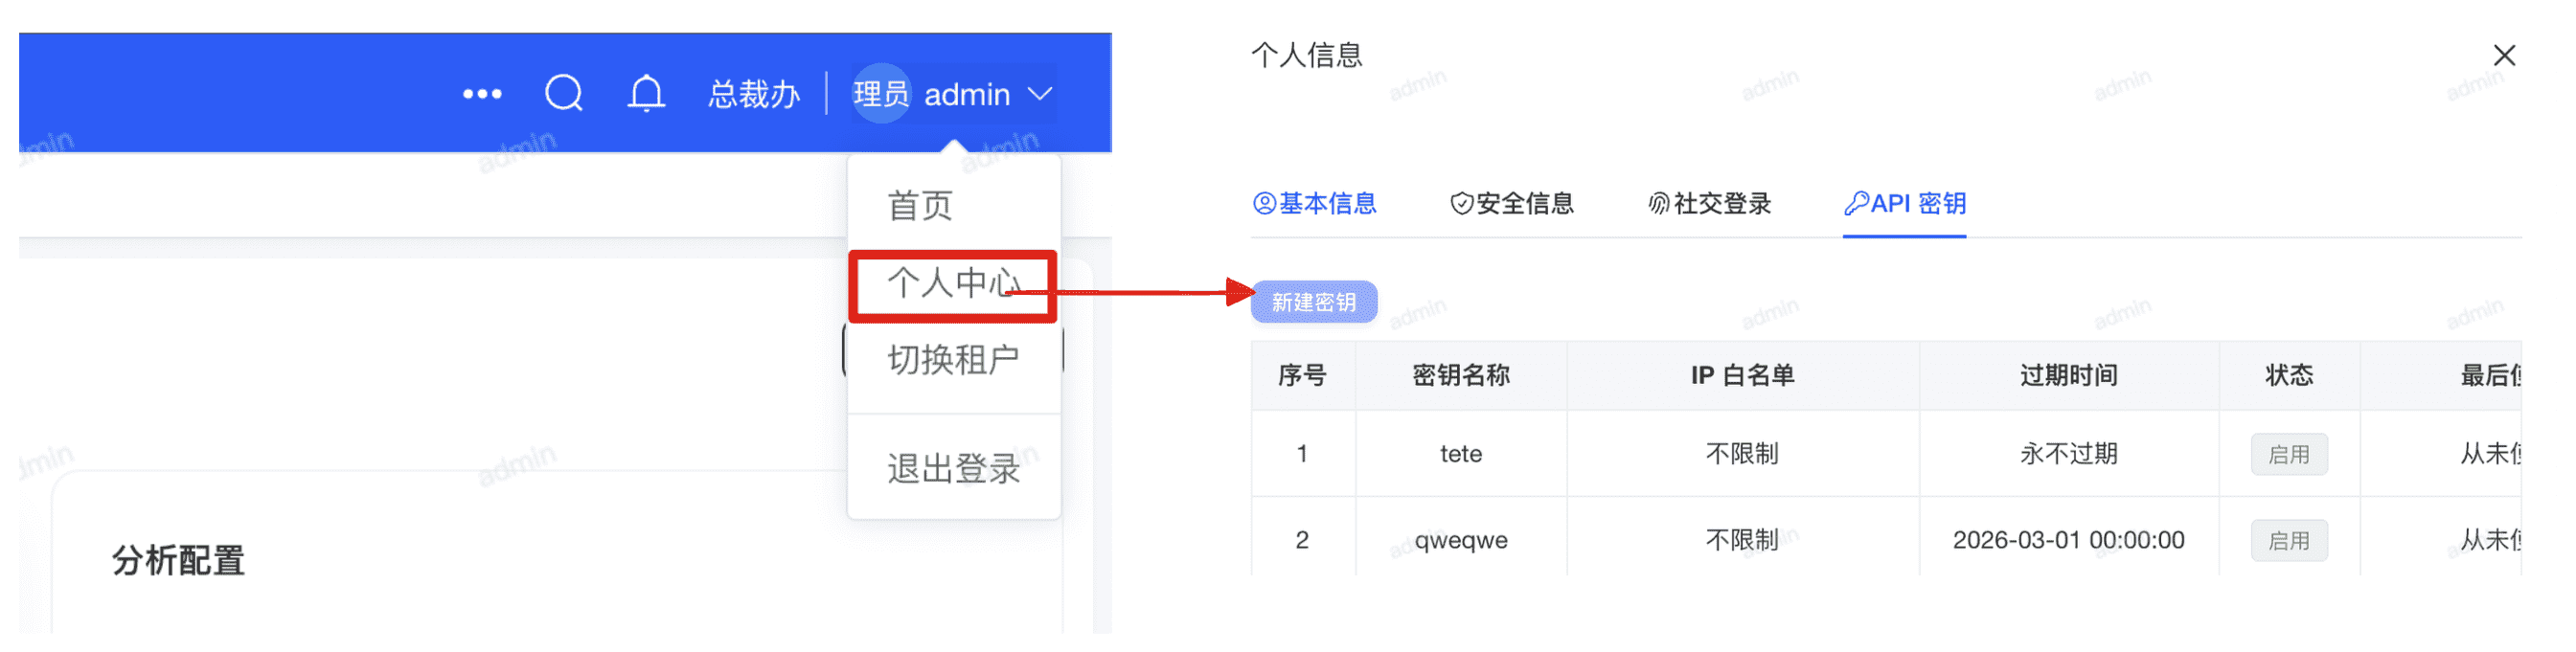
SDK 请求时会自动携带以下认证头:
3. 初始化客户端
⚠单例建议
建议将 PigAiClient 注册为单例 Bean 使用。
import com.pig4cloud.ai.client.PigAiClient;

PigAiClient client = PigAiClient.builder()
    .baseUrl("http://127.0.0.1:9999")
    .apiKey("your_api_key")
    .microService(false)     // 是否是微服务架构 (单体服务要设置false)
    .connectTimeout(30000)  // 可选:连接超时(毫秒)
    .readTimeout(60000)     // 可选:读取超时(毫秒)
    .maxRetries(3)          // 可选:最大重试次数
    .build();
4. 使用示例
4.1 阻塞式完整响应(推荐用于简单场景)
适用场景:
- 批处理任务
- 后台任务处理
- 不需要实时反馈的场景
- 简单的问答服务
特点:
- ✅ 代码简洁,易于理解
- ✅ 一次性获取完整结果
- ✅ 直接使用 API Key 认证
- ⚠️ 会阻塞当前线程直到响应完成
import com.pig4cloud.ai.model.request.ChatRequest;

// 构建聊天请求
ChatRequest request = ChatRequest.builder()
    .conversationId("test_session_001")          // 会话ID,用于追踪对话上下文
    .content("你好,请介绍一下你自己")               // 用户输入的问题
    .modelName("deepseek-v3")                    // AI模型名称
    .datasetId("0")                              // 数据集ID("0"表示不使用特定数据集)
    .build();

System.out.println("发送请求:" + request.getContent());
System.out.println("等待完整响应...\
");

// 提交并获取完整响应(阻塞直到返回结果)
String response = client.submitAndGetResponse(request);

System.out.println("AI 响应:");
System.out.println(response);

// 验证响应
assert response != null && !response.isEmpty();
输出示例:
发送请求:你好,请介绍一下你自己
等待完整响应...

AI 响应:
你好!我是一个AI助手,专门设计用来帮助回答问题、提供信息和协助完成各种任务...
4.2 流式响应(推荐用于实时交互)
适用场景:
- Web聊天界面
- 实时对话系统
- 需要逐字显示的UI
- 长文本生成(提升用户体验)
特点:
- ✅ 实时返回内容,用户体验更好
- ✅ 支持逐字/逐句显示
- ✅ 可以提前看到部分结果
- ✅ 异步执行,不阻塞主线程
- ⚠️ 需要实现回调接口处理消息
// 构建聊天请求
ChatRequest request = ChatRequest.builder()
    .conversationId("test_session_001")
    .content("你好,请介绍一下你自己")
    .datasetId("0")
    .build();


// 提交并流式获取(回调模式)
client.submitAndStream(request, new MessageListener() {
    @Override
    public void onMessage(String message) {
        // 每次接收到新的消息块时调用
        // 实时打印每个消息块(类似打字机效果)
        System.out.print(message);
    }
});
输出示例(流式输出效果):
发送请求:你好,请介绍一下你自己
AI 响应(流式输出):

[连接已建立]
你好!我是一个AI助手,专门设计用来帮助回答问题、提供信息和协助完成各种任务...
(内容逐字显示,类似打字机效果)

[流式传输完成]
总字符数:156
4.3 调用 AI 安全识别
适用于施工现场、工作场所图片中的安全隐患识别场景。
import com.pig4cloud.ai.model.request.SecurityAnalyzeRequest;
import com.pig4cloud.ai.model.response.SecurityAnalyzeResponse;

SecurityAnalyzeRequest request = SecurityAnalyzeRequest.builder()
    .imageBase64("data:image/png;base64,...")
    .modelName("glm-4v-flash")
    .securityLevel(3)
    .build();

SecurityAnalyzeResponse response = client.securityAnalyze(request);

System.out.println("是否成功: " + response.isSuccess());
System.out.println("原始分析结果: " + response.getAnalysisResult());
⚠返回说明
图片需要由调用方自行转换为 Base64。字段是平台返回的原始分析结果 JSON 字符串,SDK 不会进一步解析内部结构。
imageBase64 必填securityLevel 仅支持 1、3、5,不传时默认值为 1modelName 会由 SDK 原样透传,当前是否实际参与模型选择取决于服务端实现client.securityAnalyze(request) 返回 SecurityAnalyzeResponse
4.4 调用 OCR 解析
4.4.1 一键上传并解析(推荐)
最简单的使用方式,只需 3 行代码:
//  一键上传并解析(自动完成:文件上传 → 获取fileName → OCR解析)
OcrParseResponse response = client.uploadAndParseOcr(
    new File("/path/to/image.png"),  // 本地图片文件
    1L                                // OCR 配置 ID
);

//  获取结果
System.out.println("OCR 结果: " + response.getOcrResult());
4.4.2 一键上传并解析(带模型配置)
// 指定视觉模型和聊天模型,启用高阶解析
OcrParseResponse response = client.uploadAndParseOcr(
    new File("/path/to/image.png"),
    1L,            // OCR 配置 ID
    "qwen-max",    // 聊天模型
    "qwen-vl",     // 视觉模型
    "1"            // 高阶解析:0=普通,1=高阶
);
4.5 调用 AI FLOW 执行
4.5.1 基本流式执行
// 构建执行请求
FlowExecuteRequest request = FlowExecuteRequest.builder()
    .flowId(2003848423724408834L)           // 流程 ID(必填)
    .param("prompt", "你好,请介绍一下你自己")  // 输入参数
    .stream(true)                            // 流式返回
    .conversationId("session_001")           // 会话 ID(多轮对话)
    .build();

// 流式执行,实时输出内容
client.executeFlowStream(request, event -> {
    System.out.print(event.getContent());
});
4.5.2 带文件参数执行
当流程定义中包含 file 或 image 类型的输入变量时,需要先上传文件:
// 1. 上传文件
File imageFile = new File("/path/to/image.png");
String uploadedFileName = client.uploadFlowFile(imageFile);
System.out.println("文件上传成功: " + uploadedFileName);

// 2. 执行流程,传入文件参数
FlowExecuteRequest request = FlowExecuteRequest.builder()
    .flowId(2004528141490581505L)
    .param("prompt", "图片中有什么")
    .fileParam("files", uploadedFileName)  // 文件参数
    .build();

client.executeFlowStream(request, event -> {
    System.out.print(event.getContent());
});
5. 实战场景示例
5.1 简单的问答服务(阻塞模式)
@RestController
@RequestMapping("/api/qa")
public class QaController {

    @Autowired
    private PigAiClient pigAiClient;

    @PostMapping("/ask")
    public ResponseEntity<String> askQuestion(@RequestBody String question) {
        ChatRequest request = ChatRequest.builder()
            .conversationId("qa_" + UUID.randomUUID())
            .content(question)
            .datasetId("0")
            .build();

        try {
            String answer = pigAiClient.submitAndGetResponse(request);
            return ResponseEntity.ok(answer);
        } catch (PigAiException e) {
            return ResponseEntity.status(500).body("错误:" + e.getMessage());
        }
    }
}
5.2 Web聊天界面(流式模式 + SSE)
@RestController
@RequestMapping("/api/chat")
public class ChatController {

    @Autowired
    private PigAiClient pigAiClient;

    @GetMapping(value = "/stream", produces = MediaType.TEXT_EVENT_STREAM_VALUE)
    public SseEmitter streamChat(@RequestParam String question,
                                   @RequestParam String sessionId) {
        SseEmitter emitter = new SseEmitter(60_000L);  // 60秒超时

        ChatRequest request = ChatRequest.builder()
            .conversationId(sessionId)
            .content(question)
            .datasetId("0")
            .build();

        // 异步流式处理
        pigAiClient.submitAndStream(request, new MessageListener() {
            @Override
            public void onStart() {
                try {
                    emitter.send(SseEmitter.event().name("start").data("连接已建立"));
                } catch (IOException e) {
                    emitter.completeWithError(e);
                }
            }

            @Override
            public void onMessage(String message) {
                try {
                    // 实时推送每个消息块到前端
                    emitter.send(SseEmitter.event().name("message").data(message));
                } catch (IOException e) {
                    emitter.completeWithError(e);
                }
            }

            @Override
            public void onComplete(String fullMessage) {
                try {
                    emitter.send(SseEmitter.event().name("complete").data("完成"));
                    emitter.complete();
                } catch (IOException e) {
                    emitter.completeWithError(e);
                }
            }

            @Override
            public void onError(Exception e) {
                emitter.completeWithError(e);
            }
        });

        return emitter;
    }
}
API 接口说明
PigAiClient 主要方法
| 方法 | 说明 | 返回值 |
|---|
submitChat(ChatRequest) | 提交聊天消息 | ChatResponse(包含消息 ID) |
streamMessages(String, MessageListener) | 流式获取消息(回调) | void |
getFullResponse(String) | 获取完整响应(阻塞) | String |
submitAndStream(ChatRequest, MessageListener) | 提交并流式获取(便捷方法) | String(消息 ID) |
submitAndGetResponse(ChatRequest) | 提交并获取完整响应(便捷方法) | String(完整消息) |
close() | 关闭客户端,释放资源 | void |
ChatRequest 构建参数
| 参数 | 类型 | 必需 | 说明 |
|---|
conversationId | String | ✅ | 会话 ID,建议使用业务名称+唯一标识 |
content | String | ✅ | 用户输入的文本内容 |
modelName | String | ✅ | 模型名称(如 qwen-max) |
datasetId | String | ✅ | 功能集合 ID(函数类用 -5) |
funcName | String | ✅ | 目标功能名称 |
异常处理
SDK 提供了完善的异常层次结构:
try {
    String response = client.submitAndGetResponse(request);
    System.out.println(response);

} catch (AuthenticationException e) {
    // API Key 认证失败(401, 403)
    System.err.println("认证失败:" + e.getMessage());

} catch (ApiException e) {
    // API 业务错误(code != 0)
    System.err.println("API 错误:" + e.getMessage());

} catch (NetworkException e) {
    // 网络错误、超时
    System.err.println("网络错误:" + e.getMessage());

} catch (PigAiException e) {
    // 其他 SDK 错误
    System.err.println("SDK 错误:" + e.getMessage());
}
Spring Boot 集成
配置类
@Configuration
public class PigAiConfiguration {

    @Value("${pig.ai.base-url}")
    private String baseUrl;

    @Value("${pig.ai.api-key}")
    private String apiKey;

    @Bean
    public PigAiClient pigAiClient() {
        return PigAiClient.builder()
            .baseUrl(baseUrl)
            .apiKey(apiKey)
            .connectTimeout(30000)
            .readTimeout(60000)
            .build();
    }

    @PreDestroy
    public void cleanup() {
        pigAiClient().close();
    }
}
application.yml
pig:
  ai:
    base-url: https://your-api-domain.com
    api-key: your_api_key
Service 使用
@Service
public class AiAssistantService {

    @Autowired
    private PigAiClient pigAiClient;

    public String chat(String question) {
        ChatRequest request = ChatRequest.builder()
            .conversationId("service_" + UUID.randomUUID())
            .content(question)
            .modelName("qwen-max")
            .datasetId("-5")
            .funcName("assistant")
            .build();

        return pigAiClient.submitAndGetResponse(request);
    }
}
高级特性
API Key 认证说明
SDK 当前统一使用 API Key 进行认证,调用接口时会携带如下请求头:
- ✅ 初始化时只需配置一次
apiKey
- ✅ 聊天、OCR、安全识别、AI Flow 等能力统一复用同一套认证方式
- ✅ 认证失败时统一抛出
AuthenticationException
重试机制
网络错误会自动重试,使用指数退避策略:
- 默认最大重试 3 次
- 重试延迟:1s, 2s, 3s...
- 仅对网络错误重试,不重试认证/API 错误