#数据库读写分离
#搭建 mysql 主从
- 测试环境,pig4cloud 已经提供了快速部署的 docker 镜像
- 支持的环境变量:
REPLICATION_USER [default: replication]
REPLICATION_PASSWORD [default: replication_pass]
REPLICATION_HEALTH_GRACE_PERIOD [default: 3]
REPLICATION_HEALTH_TIMEOUT [default: 10]
MASTER_PORT [default: 3306]
MASTER_HOST [default: master]
MYSQLDUMP_PORT [default: $MASTER_PORT]
MYSQLDUMP_HOST [default: $MASTER_HOST]#启动主节点
docker run --name mysql_master -p 3316:3306 -e MYSQL_ALLOW_EMPTY_PASSWORD=1 -e REPLICATION_USER=lengleng -e REPLICATION_PASSWORD=lengleng -d registry.cn-hangzhou.aliyuncs.com/dockerhub_mirror/mysql-master-slave:5.7#启动从节点
docker run --name mysql_slave -p 3317:3306 -e MYSQL_ALLOW_EMPTY_PASSWORD=1 -e REPLICATION_USER=lengleng -e REPLICATION_PASSWORD=lengleng --link mysql_master:master -d registry.cn-hangzhou.aliyuncs.com/dockerhub_mirror/mysql-master-slave:5.7- 特殊说明: 启动主节点完成后再启动从节点,间隔 一分钟
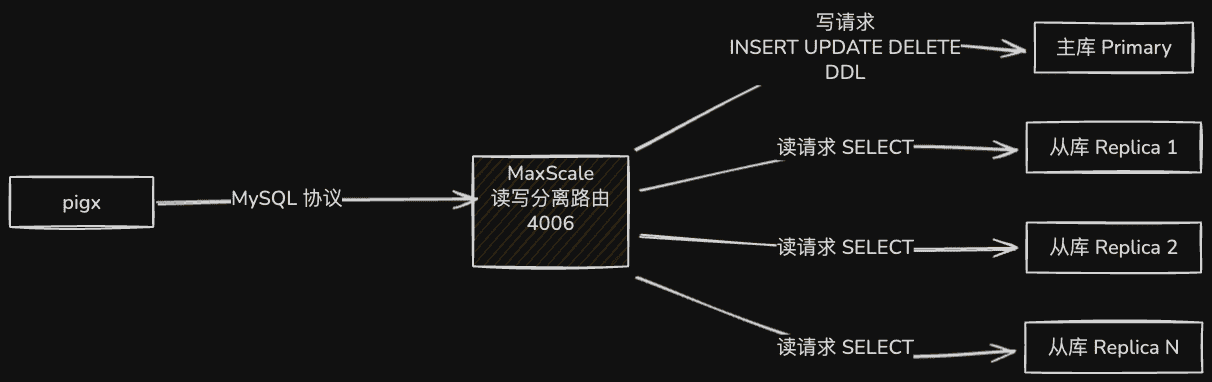
#安装 maxscale
#安装 rpm
yum install gnutls libaio.x86_64 libaio-devel.x86_64 novacom-server.x86_64 libedit -ywget https://downloads.mariadb.com/MaxScale/2.2.0/centos/7server/x86_64/maxscale-2.2.0-1.centos.7.x86_64.rpmrpm -ivh maxscale-2.2.0-1.centos.7.x86_64.rpm#mysql 主服务器创建监控与路由用户
#监控用户
create user scalemon@'%' identified by "lengleng";
grant replication slave, replication client on *.* to scalemon@'%';
#路由用户
create user maxscale@'%' identified by "lengleng";
grant all privileges on *.* to maxscale@'%';#MaxScale 服务器修改配置
vi /etc/maxscale.cnf


[maxscale]
threads=1

# 配置主服务器  3316
[server1]
type=server
address=192.168.0.25
port=3316
protocol=MySQLBackend

# 配置从服务器  3317
[server2]
type=server
address=192.168.0.25
port=3317
protocol=MySQLBackend

[MySQL Monitor]
type=monitor
module=mysqlmon
servers=server1,server2
user=scalemon
passwd=lengleng
monitor_interval=10000
detect_stale_master=true

[Read-Write Service]
type=service
router=readwritesplit
servers=server1,server2
user=maxscale
passwd=lengleng
max_slave_connections=100%
use_sql_variables_in=master
enable_root_user=1
max_slave_replication_lag=3600

[MaxAdmin Service]
type=service
router=cli

[Read-Write Listener]
type=listener
service=Read-Write Service
protocol=MySQLClient
port=4006

[MaxAdmin Listener]
type=listener
service=MaxAdmin Service
protocol=maxscaled
socket=default#启动 maxscale 服务
maxscale --config=/etc/maxscale.cnf
netstat -ntelp #主要查询4006 端口是否监听#查看 maxscale 服务状态
maxadmin

> list servers
Servers.
-------------------+-----------------+-------+-------------+--------------------
Server             | Address         | Port  | Connections | Status
-------------------+-----------------+-------+-------------+--------------------
server1            | 主服务器ip  | 10336 |           0 | Master, Running
server2            | 从服务器ip  | 10336 |           0 | Slave, Running
-------------------+-----------------+-------+-------------+--------------------


至此,完成MaxScale中间件实现MySQL读写分离。#创建应用链接的 mysql 用户
CREATE USER 'pigx'@'%' IDENTIFIED BY 'pigx123';

GRANT ALL PRIVILEGES ON *.* TO 'pigx'@'%';#pigx 应用 jdbc 接入修改
# 注意端口是 4006
spring:
  datasource:
    type: com.alibaba.druid.pool.DruidDataSource
    druid:
      driver-class-name: com.mysql.cj.jdbc.Driver
      username: pigx
      password: pigx123
url: jdbc:mysql://192.168.0.25:4006/pigxx?characterEncoding=utf8&zeroDateTimeBehavior=convertToNull&useSSL=false&useJDBCCompliantTimezoneShift=true&useLegacyDatetimeCode=false&serverTimezone=GMT%2B8&allowMultiQueries=true本页目录